


作為一位Python的開發者,您可能迫不及待想遠端控制並監控您的Raspberry Pi GPIO(通用輸入輸出)。那麼,這篇文章正符合您的需要!
本文是我們(編按:在此指 Arduino 團隊)先前介紹 《視覺化 Raspberry Pi 數據:輕鬆用 Arduino Cloud 掌握物聯網裝置》 的延伸。這次,我們將深入探討,如何使用Python 配置 Raspberry Pi的GPIO,這是許多物聯網專案的基礎步驟,通常被視為IoT應用當中的「 Hello World 」。無論是控制繼電器或監測數位輸入,學會管理GPIO都是相當重要的起手式。
然而,物聯網應用通常需要遠端存取,並透過儀表板即時監控裝置數據、查看歷史變化,甚至遠端操控裝置。
那麼,就讓我們深入了解如何實現這一切吧!
實體設置:點亮LED
在本文中,我們將展示一個簡單但完整的範例。我們會學習如何使用Arduino Cloud主控板,以遠端控制Raspberry Pi的數位GPIO。簡單來說,我們將學習如何:
- 開關連接到Raspberry Pi的LED
- 偵測連接到Raspberry Pi的按鈕是否被按下
- 監控一個整數變數的即時數值及歷史數據
首先,讓我們按照下方的電路圖,將Raspberry Pi 、 LED及按鈕連接起來。
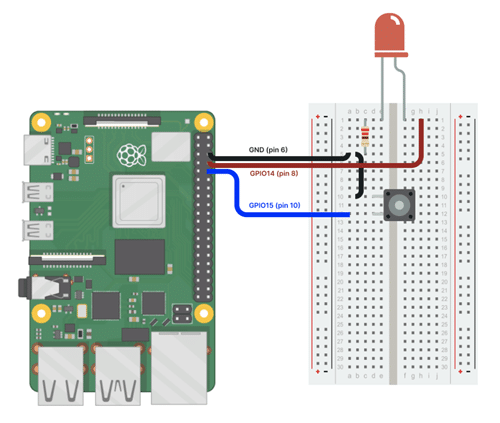
這是一個非常簡單的設置。現在一切都準備好了,就讓我們開始吧!
在Arduino Cloud建立裝置和Thing
要將Raspberry Pi的數據傳送到Arduino Cloud,只需按照以下簡單步驟操作:
- 若您還沒有Arduino Cloud帳號,請先註冊。
- 將你的裝置新增為手動裝置。
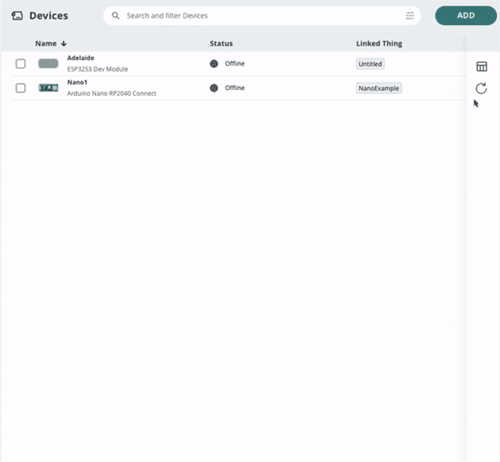
請注意:請記下您的裝置ID及密鑰,稍後我們將會用到。
- 建立您的Thing,並加入變數。
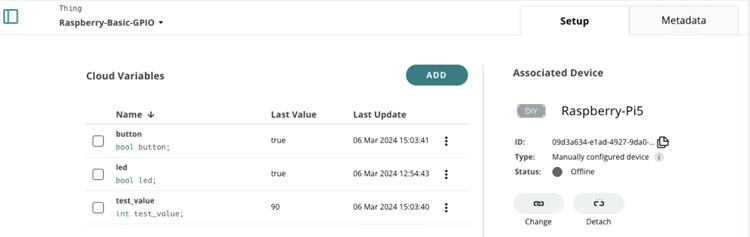
在本文的範例中,我們使用了以下三個變數:
- test_value:這是一個整數變數,我們將用它來顯示Raspberry Pi應用程式定期產生的數值,並在Arduino Cloud主控板上呈現。
- button:這是一個布林變數,當按鈕被按下時,我們會將此資訊傳送到雲端。
- led:這是一個布林變數,我們可透過Arduino Cloud主控板來開啟或關閉LED。
- 建立Arduino Cloud主控板以視覺化數據
- 建立一個開關元件(Switch Widget,名稱:LED)及一個LED元件(LED Widget,名稱:LED),並將它們連結到led變數。
- 建立一個圖表元件(Chart Widget,名稱:Value evolution)及一個數值元件(Value Widget,名稱:Value),並將它們連結到test_value變數。
- 建立一個按鈕元件(Push Button,名稱:Push Button)及一個狀態元件(Status Widget,名稱:Button),並將它們連結到 button 變數。
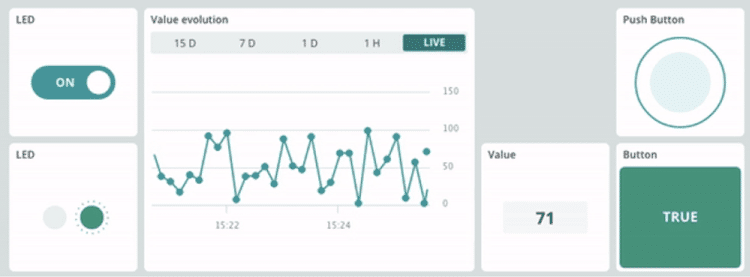
透過這個主控板,您將能:
- 使用開關元件開啟或關閉LED
- 透過LED 元件查看LED的狀態
- 透過數值元件,即時查看 test_value 變數的數值。
- 透過圖表元件,觀察 test_value 變數的變化趨勢。
- 當按鈕被按下時,透過Push Button和Button元件顯示按鈕的狀態。
請注意:您可在我們的文件指南中找到更詳細的操作說明。
針對您的物聯網裝置,運用Python在Arduino Cloud內撰寫程式
現在是時候開發您的Python應用程式了。’
(編按:以下為Python程式碼)
#! /usr/bin/python3


import random
import gpiod
from gpiod.line import Direction, Value, Bias
from arduino_iot_cloud import ArduinoCloudClient
from credentials import DEVICE_ID, SECRET_KEY


LED=14      # GPIO14, Pin 8
BUTTON=15   # GPIO15, Pin 10


# For Raspberry PI 5, the chip is gpiochip4. Check for other RPI flavours.
chip = gpiod.Chip('/dev/gpiochip4')
req=chip.request_lines(consumer="rpi-acloud-gpio-basic",
     config= {
        LED    : gpiod.LineSettings(direction=Direction.OUTPUT),
        BUTTON : gpiod.LineSettings(direction=Direction.INPUT, bias=Bias.PULL_UP),
     })


# This function is executed every 1.0 seconds (as defined in the registration) and
# returns a random integer value between 0 and 100
def read_button(client):
  button = req.get_value(BUTTON)
  if button == Value.INACTIVE:
     return False
  else:
     return True


# This function is executed every 10.0 seconds (as defined in the registration) and
# returns a random integer value between 0 and 100
def read_value(client):
  return random.randint(0, 100)


# This function is executed each time the "led" variable changes
def on_led_changed(client, value):
  if value:
      req.set_value(LED, Value.ACTIVE)
  else:
      req.set_value(LED, Value.INACTIVE)
  print("LED change! Status is: ", value)


if __name__ == "__main__":
  # Create Arduino Cloud connection
  client = ArduinoCloudClient(device_id=DEVICE_ID, username=DEVICE_ID, password=SECRET_KEY)


  # Register the Arduino Cloud variables with the callback functions
  client.register("test_value", on_read=read_value, interval=10.0)
  client.register("button", on_read=read_button, interval=1.0)
  client.register("led", value=None, on_write=on_led_changed)
   # Start the client
  client.start()

您可在Project Hub找到更多關於這項專案的資訊,所有程式碼及更多細節也可在GitHub 儲存庫中找到。
免費開始使用Arduino Cloud
將您的Raspberry Pi連接到Arduino Cloud非常容易。只需要建立一個免費帳號,便可開始使用。帳號隨時可用且免費,您還可探索進階功能以提升功能性。
所以,若您想用 Python 簡化 Raspberry Pi 應用程式的數據視覺化,不妨試試看 Arduino Cloud,並發揮它在專案中的全部潛力。
同時,敬請期待我們的 Raspberry Pi GPIO 基本控制教學系列的第三及第四部分。若您想進一步探索 Arduino Cloud ,請點擊這裡,謝謝。
(感謝Arduino.cc官網開放授權,使我們得以翻譯這篇文章,特此致謝!若讀者想要進一步閱讀原文,請點擊:閱讀原文,謝謝。)註:主圖及配圖都翻攝自arduino.cc網站,特此致謝!
(本文轉載自vMaker台灣自造者,原文連結:https://vmaker.tw/archives/73582)